TIP
本文主要是介绍 TensorFlow-数据结构及概念 。
# TensorFlow2.0快速入门--基本数据结构及概念
本教程是学习TensorFlow2.0的整理内容,适合有一定深度学习框架使用基础的读者。
本教程整理自eat_tensorflow2_in_30_days (opens new window)
# 1.张量
- 张量类型有两种:常量张量和变量张量
- 常量张量:
tf.constant(value, dtype=None, shape=None, name='Const')
常量张量不可以改变,对其重新赋值相当于创建新的内存空间
变量张量:
tf.Variable(
    initial_value=None, trainable=None, validate_shape=True, caching_device=None,
    name=None, variable_def=None, dtype=None, import_scope=None, constraint=None,
    synchronization=tf.VariableSynchronization.AUTO,
    aggregation=tf.compat.v1.VariableAggregation.NONE, shape=None
)
变量张量可以改变,通过assign和asign_add等。
# 2.计算图
计算图包括:静态计算图,动态计算图,以及Autograph.
- 静态计算图:来源于TF1.0时代,使用各种算子构建计算图,然后调用session执行计算图。
- 动态计算图:每使用一个算子便会加入到计算图中并立即执行,相比于静态计算图调试方便,但性能会有一定损失。
- Autograph:在TF2.0中,可以使用@tf.function装饰器将普通Python函数转换成对应的TensorFlow计算图构建代码,使用tf.function构建静态图的方式叫做 Autograph。
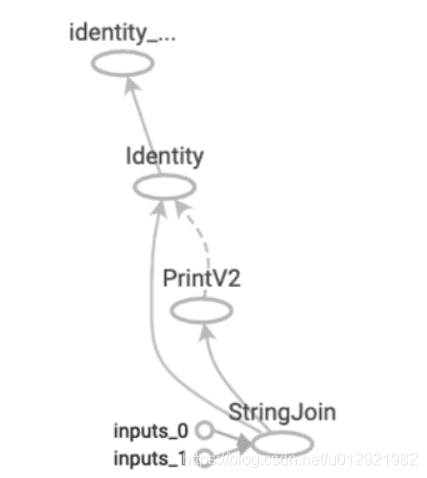
计算图由节点和线组成,节点表示算子,线表示依赖关系。实现表示数据传递依赖,虚线表示控制依赖(执行的先后顺序)。
静态计算图:
import tensorflow as tf
#定义计算图
g = tf.Graph() #tf.compat.v1.Graph()
with g.as_default():
    #placeholder为占位符,执行会话时候指定填充对象
    x = tf.placeholder(name='x', shape=[], dtype=tf.string)
    y = tf.placeholder(name='y', shape=[], dtype=tf.string)
    z = tf.string_join([x,y],name = 'join',separator=' ')

#执行计算图
with tf.Session(graph = g) as sess: #tf.compat.v1.Session(graph = g)
    print(sess.run(fetches = z,feed_dict = {x:"hello",y:"world"}))
动态计算图:
def strjoin(x,y):
    z =  tf.strings.join([x,y],separator = " ")
    tf.print(z)
    return z

result = strjoin(tf.constant("hello"),tf.constant("world"))
print(result)
Autograph:
import tensorflow as tf

## 使用autograph构建静态图

@tf.function
def strjoin(x,y):
    z =  tf.strings.join([x,y],separator = " ")
    tf.print(z)
    return z
result = strjoin(tf.constant("hello"),tf.constant("world"))
print(result)
求导 一阶单数计算
x = tf.Variable(0.0,name = "x",dtype = tf.float32)
a = tf.constant(1.0)
b = tf.constant(-2.0)
c = tf.constant(1.0)
with tf.GradientTape() as tape:
    tape.watch([a,b,c]) ## 对常量求导需要加watch
    y = a*tf.pow(x,2) + b*x + c
dy_dx,dy_da,dy_db,dy_dc = tape.gradient(y,[x,a,b,c])
二阶导数计算
with tf.GradientTape() as tape2:
    with tf.GradientTape() as tape1:
        y = a*tf.pow(x,2) + b*x + c
    dy_dx = tape1.gradient(y,x)
dy2_dx2 = tape2.gradient(dy_dx,x)
使用AutoGraph的写法
@tf.function
def f(x):
    a = tf.constant(1.0)
    b = tf.constant(-2.0)
    c = tf.constant(1.0)

    ## 自变量转换成tf.float32
    x = tf.cast(x,tf.float32)
    with tf.GradientTape() as tape:
        tape.watch(x)
        y = a*tf.pow(x,2)+b*x+c
    dy_dx = tape.gradient(y,x)

    return((dy_dx,y))
简单优化流程
x = tf.Variable(0.0, name='x', dtype=tf.float32)
optimizer = tf.keras.optimizers.SGD(learning_rate=0.01)
###方式一###
@tf.function
def minize_func1():
    a = tf.constant(1.0)
    b = tf.constant(-2.0)
    c = tf.constant(1.0)

    for _ in tf.range(1000):
        with tf.GradientTape() as tape:
            y = a*tf.pow(x,2) + b*x + c
        dy_dx = tape.gradient(y, x)
        print(dy_dx)
        optimizer.apply_gradients(grads_and_vars=[(dy_dx, x)])

    y = a*tf.pow(x,2) + b*x + c
    return y

###方式二###
@tf.function
def f():
    a = tf.constant(1.0)
    b = tf.constant(-2.0)
    c = tf.constant(1.0)
    y = a*tf.pow(x,2) + b*x + c
    return y

@tf.function
def minize_func2():
    for _ in tf.range(1000):
        optimizer.minimize(f,[x])
    return f()
# 3.张量的结构操作
张量的结构操作包括:张量创建、索引切片、维度变换、合并分割 张量创建:
#range
tf.range(limit, delta=1, dtype=None, name='range')
tf.range(start, limit, delta=1, dtype=None, name='range')
#linspace
tf.linspace(start, stop, num, name=None)
#zeros
tf.zeros(shape, dtype=tf.dtypes.float32, name=None)
tf.zeros_like(input, dtype=None, name=None)
#ones
tf.ones(shape, dtype=tf.dtypes.float32, name=None)
tf.ones_like(input, dtype=None, name=None)
#fill
tf.fill(dims, value, name=None) #填充一个固定大小的tensor
#random
tf.random.normal(shape, mean=0.0, stddev=1.0, dtype=tf.dtypes.float32, seed=None, name=None)
tf.random.uniform(shape, minval=0, maxval=None, dtype=tf.dtypes.float32, seed=None, name=None)
索引切片 连续数据切片操作
data[0] #data的0行
data[1:3] #data的1,2行
data [1:3,1:3] #data中的一个字部分
tf.slice(input_, begin, size, name=None) #
data[...,1] #...可以代表省略的多个冒号
非连续数据切片操作
#实现从指定axis选取indices中数据的功能
tf.gather(params, indices, validate_indices=None, axis=None, batch_dims=0, name=None)
#用于收集给定位置的元素,例如按照所需数据下标找到目标数据
tf.gather_nd(params, indices, batch_dims=0, name=None)
#上述两个方法都是通过boolean_mask实现
tf.ragged.boolean_mask(data, mask, name=None)
上述非连续数据切片操作只能获得数据的收集操作,但不能进行更改,如果需要通过修改张量中的部分数据得到新的张量可以使用tf.where和tf.scatter_nd。
#若省略x和y,tf.where返回满足条件的坐标;否则根据条件True则选择x相对应的位置数据,否则选择y相对应的数据。
tf.where(condition, x=None, y=None, name=None)
#可以实现sctter的更新数据
tf.scatter_nd(indices, updates, shape, name=None)
维度变换
tf.reshape可以实现张量形状的改变,不会改变元素的存储顺序,执行非常迅速。
tf.reshape(tensor, shape, name=None)
tf.squeeze和tf.expand_dims 可以实现减少和增加维度
tf.squeeze(input, axis=None, name=None)
tf.expand_dims(input, axis, name=None)
tf.transpose可以改变数据的维度,用于图像通道的转换
tf.transpose(a, perm=None, conjugate=False, name='transpose') 合并分割
tf.concat(values, axis, name='concat') #不会增加原有数据的维度
tf.stack(values, axis=0, name='stack') #会增加数据的维度
tf.split(value, num_or_size_splits, axis=0, num=None,name='split') #依据num_or_size_splits的类型将数据分为多个部分,或是按照指定的大小分割
# 4.张量的数学运算
# 常用函数
tf.cast(x, dtype, name=None)可以实现数据类型的转换
tf.rank(input, name=None)返回数据的维度
# 参考文章
- https://blog.csdn.net/u012921982/article/details/105517533